آپلود فایل با استفاده از JQuery Progress Bar در MVC
دوشنبه 3 مهر 1396در این مقاله قصد داریم که به شما نحوه پیاده سازی jquery progress bar در کنترل فایل آپلود در ASP.Net MVC را به صورت گام به گام و تصویری و مطرح کردن یک مثال آموزش بدهیم.

گام اول) ما باید یک پروژه mvc در visual studio ایجاد کنیم.برای انجام اینکار،visual studio را باز کنید و New Project را انتخاب کنید ویک پنجره دیالوگ جدید برای شما ظاهر میشود ، از سمت چپ آن را انتخاب کنید سپس Web را انتخاب کنید و بعد از آن ASP.NET MVC 4 Application را انتخاب کرده و یک نام برای پروژه خود انتخاب کنید و بر روی OK کلیک کنید.
دوباره یک پنجره دیالوگ برای شما باز خواهد شد.در این پنجره Internet Application را انتخاب کنید.
تصاویر زیر را رفرنس کار خود قرار دهید:


گام دوم)در حال حاضر شما فایل های پروژه خود را در سمت راست visual studio مشاهده میکنید.به تصاویر زیر توجه کنید:

گام سوم ) فولدر controller را باز کنید.ما در آن کنترلرهای پیشفرض Home و Account را داریم.اینها زمانی که یک پروژه جدید asp mvc ایجاد کردیم ، ایجاد شده اند.
اگر شما کنترلر Home را باز کنید، میتوانید کدهای پیش فرض آن را مشاهده کنبد.به تصاویر زیر دقت کنید:

گام چهارم)در پوشه View ما میتوانیم فولدر Home را مشاهده کنیم و میتوانیم View به نام Index را مشاهده کنیم.این زمانی که که پروژه را ایجاد کردیم ، ایحاد شده است.
اگر شما میخواهید یک View برای Action Result خود ایجاد کنید ، فقط بر روی action result راست کلیک کنید و گزینه Add View را انتخاب کنید.به تصاویر زیر دقت کنید:

گام پنجم)حالا کدهای Index را بسته به نیاز خود تغییر دهید.
لطفا کدهای زیر را کپی و در ویو Index قرار دهید.
توجه)ما در اینجا css و script های مربوط به ProgressBar را با استفاده از CDN افزوده ایم.
@{
    ViewBag.Title = "Home Page";
}
<link href="https://code.jquery.com/ui/1.10.4/themes/ui-lightness/jquery-ui.css"
    rel="stylesheet">   @*I got this link from Tutorials point*@
<link href="../../Content/bootstrap.css" rel="stylesheet" type="text/css" /> @*Download Bootstrap from Nuget Package manager*@
<link href="../../Content/bootstrap-theme.css" rel="stylesheet" type="text/css" />
<style>
    .ui-widget-header
    {
        background: #cedc98;
        border: 1px solid #DDDDDD;
        color: #333333;
        font-weight: bold;
    }
    .progress-label
    {
        position: absolute;
        left: 50%;
        top: 13px;
        font-weight: bold;
        text-shadow: 1px 1px 0 #fff;
    }
    .red
    {
        color: red;
    }
</style>
<div class="container">
    <h1>
        File Upload Demo</h1>
    <div id="FileBrowse">
        <div class="row">
            <div class="col-sm-4">
                <input type="file" id="Files" />
            </div>
            <div class="col-sm-2">
                <input type="button" id="UploadBtn" class="btn btn-danger" value="Upload" />
            </div>
        </div>
    </div>
    <div class="row">
        <div class="col-sm-4">
            <div id="progressbar-5">
                <div class="progress-label">
                </div>
            </div>
        </div>
    </div>
    <br />
    <div class="row">
        <div class="col-sm-6">
            <table class="table" id="ListofFiles">
                <tr>
                    <th>
                        Files
                    </th>
                    <th>
                        Action
                    </th>
                </tr>
            </table>
        </div>
    </div>
    <br />
    <br />
    <br />
    <br />
</div>
@section scripts{
    <script src="https://code.jquery.com/jquery-1.10.2.js"></script>
    <script src="https://code.jquery.com/ui/1.10.4/jquery-ui.js"></script>
    <script>

        $('#UploadBtn').click(function () {

            var fileUpload = $("#Files").get(0);
            var files = fileUpload.files;
            // Create FormData object
            var fileData = new FormData();
            // Looping over all files and add it to FormData object
            for (var i = 0; i < files.length; i++) {
                fileData.append(files[i].name, files[i]);
            }
            $.ajax({
                url: '/Home/UploadFiles',
                type: "POST",
                contentType: false, // Not to set any content header
                processData: false, // Not to process data
                data: fileData,
                async: false,
                success: function (result) {
                    if (result != "") {
                        $('#FileBrowse').find("*").prop("disabled", true);
                        LoadProgressBar(result); //calling LoadProgressBar function to load the progress bar.
                    }
                },
                error: function (err) {
                    alert(err.statusText);
                }
            });

        });

        function LoadProgressBar(result) {
            var progressbar = $("#progressbar-5");
            var progressLabel = $(".progress-label");
            progressbar.show();
            $("#progressbar-5").progressbar({
                //value: false,
                change: function () {
                    progressLabel.text(
                     progressbar.progressbar("value") + "%");  // Showing the progress increment value in progress bar
                },
                complete: function () {
                    progressLabel.text("Loading Completed!");
                    progressbar.progressbar("value", 0);  //Reinitialize the progress bar value 0
                    progressLabel.text("");
                    progressbar.hide(); //Hiding the progress bar
                    var markup = "<tr><td>" + result + "</td><td><a href='#' onclick='DeleteFile(\"" + result + "\")'><span class='glyphicon glyphicon-remove red'></span></a></td></tr>"; // Binding the file name
                    $("#ListofFiles tbody").append(markup);
                    $('#Files').val('');
                    $('#FileBrowse').find("*").prop("disabled", false);
                }
            });
            function progress() {
                var val = progressbar.progressbar("value") || 0;
                progressbar.progressbar("value", val + 1);
                if (val < 99) {
                    setTimeout(progress, 25);
                }
            }
            setTimeout(progress, 100);
        }

        function DeleteFile(FileName) {

        //Write your delete logic here
        }

    </script>
}
به درک کدهای جدید میپردازیم ، ما از یک کنترل file input و html input button استفاده کرده ایم.کد ها را در زیر مشاهده میکنید:
<div id="FileBrowse">
       <div class="row">
           <div class="col-sm-4">
               <input type="file" id="Files" />
           </div>
           <div class="col-sm-2">
               <input type="button" id="UploadBtn" class="btn btn-danger" value="Upload" />
           </div>
       </div>
   </div>
   <div class="row">
       <div class="col-sm-4">
           <div id="progressbar-5">
               <div class="progress-label">
               </div>
           </div>
       </div>
   </div>
ما از یک جدول html برای نمایش لیست فایل ها استفاده کرده ایم.کدهای مربوط به آن را در زیر مشاهده میکنید:
<div class="row">
        <div class="col-sm-6">
            <table class="table" id="ListofFiles">
                <tr>
                    <th>
                        Files
                    </th>
                    <th>
                        Action
                    </th>
                </tr>
            </table>
        </div>
    </div>
در jquery ما برای دکمه آپلود یک رویداد cLICK نوشته ایم و فایل را با استفاده از یک متد ajax به کنترلر پاس میدهیم.به کدهای زیر دقت کنید:
$('#UploadBtn').click(function () {

           var fileUpload = $("#Files").get(0);
           var files = fileUpload.files;
           // Create FormData object
           var fileData = new FormData();
           // Looping over all files and add it to FormData object
           for (var i = 0; i < files.length; i++) {
               fileData.append(files[i].name, files[i]);
           }
           $.ajax({
               url: '/Home/UploadFiles',
               type: "POST",
               contentType: false, // Not to set any content header
               processData: false, // Not to process data
               data: fileData,
               async: false,
               success: function (result) {
                   if (result != "") {
                       $('#FileBrowse').find("*").prop("disabled", true);
                       LoadProgressBar(result); //calling LoadProgressBar function to load the progress bar.
                   }
               },
               error: function (err) {
                   alert(err.statusText);
               }
           });

       });
بیایید اکشن UploadFiles را در کنترلر برای دریافت فایل از درخواست و ذخیره آن در پوشه Uploads ایجاد کنیم.کدهای زیر را مشاهده کنید:
public ActionResult UploadFiles()
       {
           string FileName="";
           HttpFileCollectionBase files = Request.Files;
           for (int i = 0; i < files.Count; i++)
           {
               //string path = AppDomain.CurrentDomain.BaseDirectory + "Uploads/";
               //string filename = Path.GetFileName(Request.Files[i].FileName);

               HttpPostedFileBase file = files[i];
               string fname;

               // Checking for Internet Explorer
               if (Request.Browser.Browser.ToUpper() == "IE" || Request.Browser.Browser.ToUpper() == "INTERNETEXPLORER")
               {
                   string[] testfiles = file.FileName.Split(new char[] { '\\' });
                   fname = testfiles[testfiles.Length - 1];
               }
               else
               {
                   fname = file.FileName;
                   FileName = file.FileName;
               }

               // Get the complete folder path and store the file inside it.
               fname = Path.Combine(Server.MapPath("~/Uploads/"), fname);
               file.SaveAs(fname);
           }
           return Json(FileName, JsonRequestBehavior.AllowGet);
       }
در رویداد Button Click ما تابع "LoadProgressbar" را برای بارگیری progress bar و پیوستن فیلدها در جدول، فراخوانی می کنیم.
تمام کدها در LoadProgressBar نوشته شده است.کدهای زیر را مشاهده کنید:
function LoadProgressBar(result) {
           var progressbar = $("#progressbar-5");
           var progressLabel = $(".progress-label");
           progressbar.show();
           $("#progressbar-5").progressbar({
               //value: false,
               change: function () {
                   progressLabel.text(
                    progressbar.progressbar("value") + "%");  // Showing the progress increment value in progress bar
               },
               complete: function () {
                   progressLabel.text("Loading Completed!");
                   progressbar.progressbar("value", 0);  //Reinitialize the progress bar value 0
                   progressLabel.text("");
                   progressbar.hide(); //Hiding the progress bar
                   var markup = "<tr><td>" + result + "</td><td><a href='#' onclick='DeleteFile(\"" + result + "\")'><span class='glyphicon glyphicon-remove red'></span></a></td></tr>"; // Binding the file name
                   $("#ListofFiles tbody").append(markup);
                   $('#Files').val('');
                   $('#FileBrowse').find("*").prop("disabled", false);
               }
           });
           function progress() {
               var val = progressbar.progressbar("value") || 0;
               progressbar.progressbar("value", val + 1);
               if (val < 99) {
                   setTimeout(progress, 25);
               }
           }
           setTimeout(progress, 100);
       }
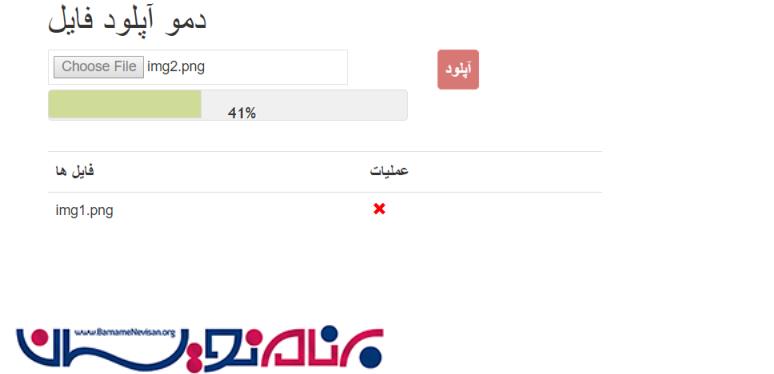
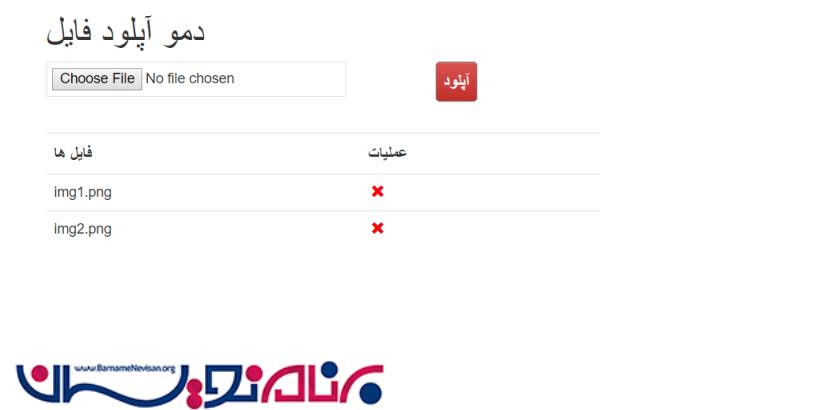
حالا ، برنامه را اجرا کنید.

با تشکر از شما برای مطالعه این مقاله ، امیدواریم این مقاله برای شما مفید بوده باشد.

- ASP.net MVC
- 3k بازدید
- 10 تشکر