پیاده سازی CRUD با استفاده از SignalR و Entity Framework
دوشنبه 8 شهریور 1395در این مقاله قصد داریم با استفاده از Entity Framework و SignalR در ASP.NET MVC حذف ، افزودن ، ویرایش را به صورت realtime انجام دهیم و از روش Code First استفاده می کنیم .

مقدمه
SignalR تکنولوژی است که به ما قابلیت افزودن توابع real time را به وب سایت خود اضافه کنیم . این بدان معنا است که افزودن ، حذف ، ویرایش محتوا با داده ها بلافاصله انجام می شود.
Entity Framework یک ORM است که کار با داده های رابطه ای را با استفاده از شی هایی با دامنه خاص ، آسان تر می کند برای دسترسی به داده ها ما از روش Code First استفاده می کنیم.
ASP.NET MVC یک فریم ورک برای پیاده سازی scalable ، مبتنی بر استاندارد های برنامه کاربردی وب است .
شروع کار به صورت مرحله ای
مرحله اول : یک پروژه MVC ایجاد می کنیم و رفرنس EF را با پروژه اضافه می کنیم .
در این قسمت ویژوال استودیو را اجرا کرده و یک پروژه mvc ایجاد می کنیم و دستور زیر را در Package Manager Console وارد می کنیم تا EF به پروژه اضافه شود .
using System.ComponentModel.DataAnnotations;

namespace WebApplication1.Models
{
    public class Employee
    {
        [Key]
        public int EmployeeID { get; set; }
        public string EmployeeName { get; set; }
        public string EmailAdress { get; set; }
        public string MobileNumber { get; set; }
    }
}
مرحله سوم : حال کلاس Context را ایجاد می کنیم .
در این قسمت کلاس EmployeeContext را ایجاد کرده ایم کد زیر را مشاهده کنید :
using System.Data.Entity;
using WebApplication1.Models;

namespace WebApplication1
{
    public class EmployeeContext : DbContext
    {
        public EmployeeContext() : base("dbConnectionString")
        {
            Database.SetInitializer<EmployeeContext>(new CreateDatabaseIfNotExists<EmployeeContext>());
        }
        public DbSet<Employee> Employees { get; set; }
    }
}
مرحله چهارم : یک Connection String به Web.config اضافه می کنیم .
<connectionStrings>
    <add name="dbConnectionString" connectionString="Data Source=yourdatasource;Initial Catalog=EmployeeDB;User ID=youdbuserid;Password=yourdbpassword;pooling=false; MultipleActiveResultSets=True;pooling=false;" providerName="System.Data.SqlClient" />
</connectionStrings>
مرحله 5 : نصب SignalR با استفاده از Nuget
با وارد کردن دستور زیر در Package Manager Console ، SignalR به پروژه اضافه می شود .
Install-Package Microsoft.AspNet.SignalR
در این قسمت ما نیاز به ایجاد Startup.cs داریم که هدف از ایجاد این فایل اضافه کردن یک middleware به جریان OWIN است . برای افزودن این فایل بر روی پروژه راست کلیک و در قسمت Add ، OWIN Startup class را انتخاب می کنیم .
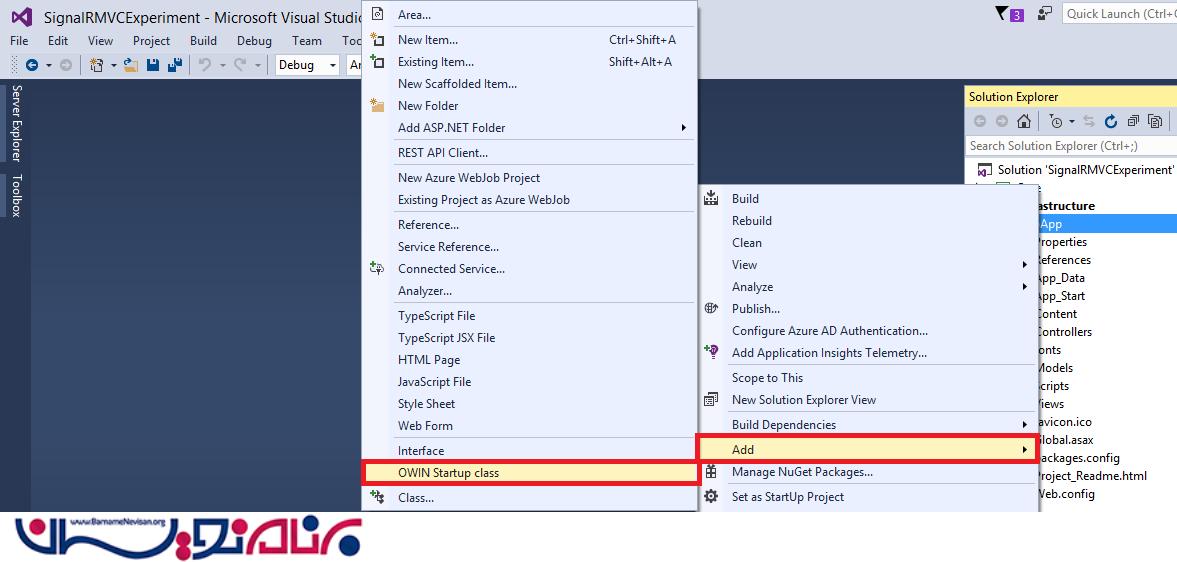
نام آن را Startup قرار می دهیم .
تصویر زیر شامل کد های فایل startup.cs است .
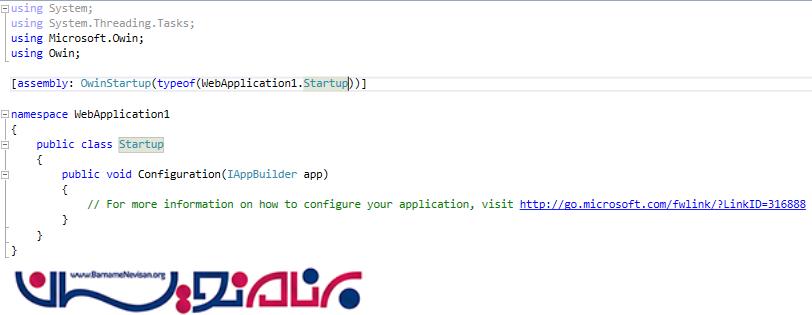
کد زیر کلاس Startup را پیدا می کند .
[assembly: OwinStartup(typeof(WebApp.Startup))]
این نشان دهده این است که این کلاس تابع دریافت ، Microsoft.Owin.IowinContext را اجرا می کند .
هنگامی که سرور درخواست HTTP را دریافت می کند ، OWIN pipeline فراخوانی می شود و middleware را درخواست می کند .
Middleware نوع محتوا را برای پاسخ و نوشتن پاسخ در body ، تعیین می کند .
در حال حاظر در تابع Configuration ما به map SignalR hubs نیاز داریم . برای اضافه کردن آن میتوان از روش زیر استفاده کرد .
using Microsoft.Owin;
using Owin;

[assembly: OwinStartup(typeof(WebApplication1.Startup))]

namespace WebApplication1
{
    public class Startup
    {
        public void Configuration(IAppBuilder app)
        {
            app.MapSignalR();
        }
    }
}
دراین قسمت نیاز به ایجاد یک Hub داریم . کلاس Hub با استفاده از communication بین Client و Server یک اتصال ایجاد می کند .این عمل باعث می شود که Server , Client از راه دور به هم متصل شوند . برای پیاده سازی این عمل یک کلاس به نام EmployeeHub.cs ایجاد می کنیم و کد های زیر را وارد می کنیم .
using Microsoft.AspNet.SignalR;
using Microsoft.AspNet.SignalR.Hubs;

namespace WebApplication1
{
    public class EmployeeHub : Hub
    {
        [HubMethodName("NotifyClients")]
        public static void NotifyCurrentEmployeeInformationToAllClients()
        {
            IHubContext context = GlobalHost.ConnectionManager.GetHubContext<EmployeeHub>();

            // the update client method will update the connected client about any recent changes in the server data
            context.Clients.All.updatedClients();
        }
    }
}
Hub یک کلاس abstract است که متد های SignalR را ارجاع می دهد . و با ارتباط برقرار کردن با SignalR به Microsoft.AspNet.SignalR.Hub. متصل می شود .
IHubContext context = GlobalHost.ConnectionManager.GetHubContext<EmployeeHub>();
Context ، Employee را دریافت می کند . متد updatedClients میخواهد متد Client را بروزرسانی کند و تغییراتی که برروی داده های انجام شده بر روی سرور اعمال کند .
context.Clients.All.updatedClients();
قسمت SignalR client فراخوانی می شود و متد جاوا اسکریپتی updatedClients() اجرا می شود . Hub در ارسال پیام و داده بین Client و سرور بسیار مهم است .
مرحله ششم : ایجاد Controller
کد های تشکیل دهنده Controller است .
using System.Collections.Generic;
using System.Data.Entity;
using System.Linq;
using System.Web.Mvc;
using WebApplication1.Models;

namespace WebApplication1.Controllers
{
    public class HomeController : Controller
    {
        List<Employee> empList;

        //Fetch Employee Records
        public ActionResult Index()
        {
            return View();
        }
        [HttpGet]
        public ActionResult GetAllEmployeeRecords()
        {
            using (var context = new EmployeeContext())
            {
                empList = context
                .Employees
                .ToList();
            }
            return PartialView("_EmployeeList", empList);
        }


        //Insert Employee Record
        public ActionResult Insert()
        {
            return View();
        }
        [HttpPost]
        public ActionResult Insert(Employee employee)
        {
                if (ModelState.IsValid)
                {
                    //Insert into Employee table
                    using (var context = new EmployeeContext())
                    {
                            context.Employees.Add(employee);
                            context.SaveChanges();
                    }
                }

            //Once the record is inserted , then notify all the subscribers (Clients)
            EmployeeHub.NotifyCurrentEmployeeInformationToAllClients();
            return RedirectToAction("Index");
        }

        //Update Employee Record
        public ActionResult Update()
        {
            return View();
        }
        [HttpPost]
        public ActionResult Update(Employee employee)
        {
            using (var context = new EmployeeContext())
            {
                var empRecord = context.Employees.Find(employee.EmployeeID);

                empRecord.EmployeeName = employee.EmployeeName;
                empRecord.EmailAdress = employee.EmailAdress;
                empRecord.MobileNumber = employee.MobileNumber;

                context.Employees.Add(empRecord);

                context.Entry(empRecord).State = EntityState.Modified;
                context.SaveChanges();
            }

            //Once the record is inserted , then notify all the subscribers (Clients)
            EmployeeHub.NotifyCurrentEmployeeInformationToAllClients();
            return RedirectToAction("Index");
        }

        //Delete Employee Record
        [HttpPost]
        public ActionResult Delete(Employee employee)
        {
            using (var context = new EmployeeContext())
            {
                var empRecord = context.Employees.Find(employee.EmployeeID);
                context.Employees.Remove(empRecord);
                context.SaveChanges();
            }

            //Once the record is inserted , then notify all the subscribers (Clients)
            EmployeeHub.NotifyCurrentEmployeeInformationToAllClients();
            return RedirectToAction("Index");
        }
    }
}
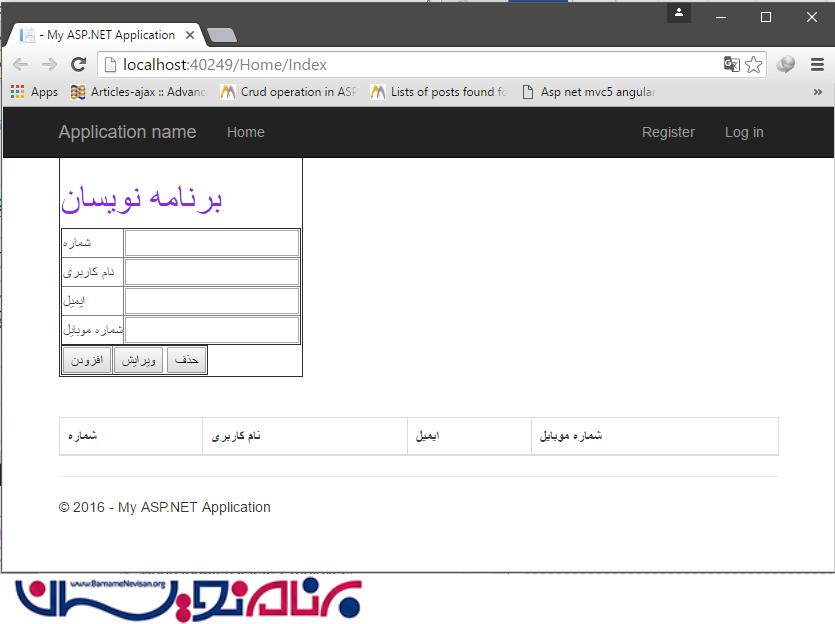
مرحله هفتم : ایجاد View
در نهایت ، به طراحی UI و درخواست API های Controller و وارد کردن اطلاعات کاربران به صورت real time و بروزرسانی آنها میپردازیم . کد های زیر تشکیل دهنده فایل Index.cshtml است :
@model IList<SignalRSample.Models.Employee>
@{

}
<link href="~/Content/bootstrap.min.css" rel="stylesheet" />

<div>
    <table border="1">
        <tr>
            <td>
                <h1 style="color:blueviolet">برنامه نویسان</h1>
                <table border="1">
                    <tr>
                        <td>شماره</td>
                        <td><input id="txtEmployeeId" type="text" /></td>
                    </tr>
                    <tr>
                        <td>نام کاربری</td>
                        <td><input id="txtEmployeeName" type="text" /></td>
                    </tr>
                    <tr>
                        <td>ایمیل</td>
                        <td><input id="txtEmail" type="text" /></td>
                    </tr>
                    <tr>
                        <td>شماره موبایل</td>
                        <td><input id="txtMobile" type="text" /></td>
                    </tr>
                </table>
                <table border="1">
                    <tr>
                        <td><button id="btnPostEmployee" onclick="InsertEmployee()">افزودن</button></td>
                        <td>
                            <button id="btnPutEmployee" onclick="UpdateEmployee()">ویرایش</button>
                            <button id="btnDeleteEmployee" onclick="DeleteEmployee();return false;">حذف</button>
                        </td>
                    </tr>
                </table>
            </td>
        </tr>
    </table>
    <br /><br />
    <div id="dataTable"></div>
</div>

@section Scripts{


    <script type="text/javascript">
        $(function () {

            // Create a proxy to signalr hub on web server. It reference the hub.
            var notificationFromHub = $.connection.employeeHub;

            // Connect to signalr hub
            $.connection.hub.start().done(function () {
                                FetchEmployees();

            });

            // Notify to client with the recent updates
            notificationFromHub.client.updatedClients = function () {
                FetchEmployees();
            };
        });

        function FetchEmployees() {
            var model = $('#dataTable');
            $.ajax({
                    url: '/home/GetAllEmployeeRecords',
                    contentType: 'application/html ; charset:utf-8',
                    type: 'GET',
                    dataType: 'html'
                })
                .success(function(result) { model.empty().append(result); });
        }

        // Insert Employee Record
        function InsertEmployee()
        {

                    var employee = {
                        EmployeeID: $('#txtEmployeeId').val(),
                        EmployeeName: $('#txtEmployeeName').val(),
                        EmailAdress: $('#txtEmail').val(),
                        MobileNumber: $('#txtMobile').val()
                    };


                    $.ajax({
                    url: '/home/Insert',
                    type: 'POST',
                    data: JSON.stringify(employee),
                    contentType: "application/json;charset=utf-8",
                    success: function (data) {
                        alert('Employee added Successfully');
                    },
                    error: function () {
                        alert('Employee not Added');
                    }
                    });


        }

        // Update Employee Record
        function UpdateEmployee() {

            var employee = {
                EmployeeID: $('#txtEmployeeId').val(),
                EmployeeName: $('#txtEmployeeName').val(),
                EmailAdress: $('#txtEmail').val(),
                MobileNumber: $('#txtMobile').val()
            };

            $.ajax({
                url: '/home/Update',
                type: 'POST',
                data: JSON.stringify(employee),
                contentType: "application/json;charset=utf-8",
                success: function (data) {
                    alert('Employee updated Successfully');
                },
                error: function (e) {
                    alert('Employee could not be updated');
                }
            });

        }

        // Delete Employee Record
        function DeleteEmployee() {

            var employee = {
                EmployeeID: $('#txtEmployeeId').val()
            };

            $.ajax({
                url: '/home/Delete',
                type: 'POST',
                data: JSON.stringify(employee),
                contentType: "application/json;charset=utf-8",
                success: function (data) {
                    alert('Employee deleted Successfully');
                },
                error: function (x, y, z) {
                    alert(x + '\n' + y + '\n' + z);
                }
            });

        }
    </script>
}
قطعه کد
            // Create a proxy to signalr hub on web server. It reference the hub.
            var notificationFromHub = $.connection.employeeHub;

            // Connect to signalr hub
            $.connection.hub.start().done(function () {
                FetchEmployees();
            });

            // Notify to client with the recent updates
            notificationFromHub.client.updatedClients = function () {
                FetchEmployees();
            };
        });
در ابتدا یک Proxy در SignalR Hub روی وب سرور ایجاد کرده ایم . و پس از انجام شدن عملیات ما نیاز به اتصال به Hub داریم .سرور، بروزرسانی رکورد ها را با استفاده از متد updatedClients اطلاع رسانی می کند .
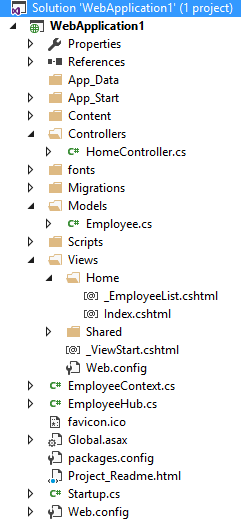
حال یکم Patial View به نام _Employee.cshtml برای نمایش سوابق کارمندها ایجاد می کنیم.
<table class="table table-bordered table-striped">
    <thead>
        <tr>
            <th>شماره</th>
            <th>نام کاربری</th>
            <th>ایمیل</th>
            <th>شماره موبایل</th>
        </tr>
    </thead>
    <tbody>
        @if (Model != null)
            {
                foreach (var item in Model)
                {

                <tr>
                    <td>@item.EmployeeID</td>
                    <td>@item.EmployeeName</td>
                    <td>@item.EmailAdress</td>
                    <td>@item.MobileNumber</td>
                </tr>
            }
        }

    </tbody>
</table>
تمامی عملیاتی که انجام داده ایم میتوان در زیر مشاهده کنید .
مرحله هشتم : برنامه را اجرا می کنیم.
برنامه را با دو مرورگر مختلف اجرا می کنیم .
حال یک کارمند در هر دو مرورگر اضافه می کنیم .
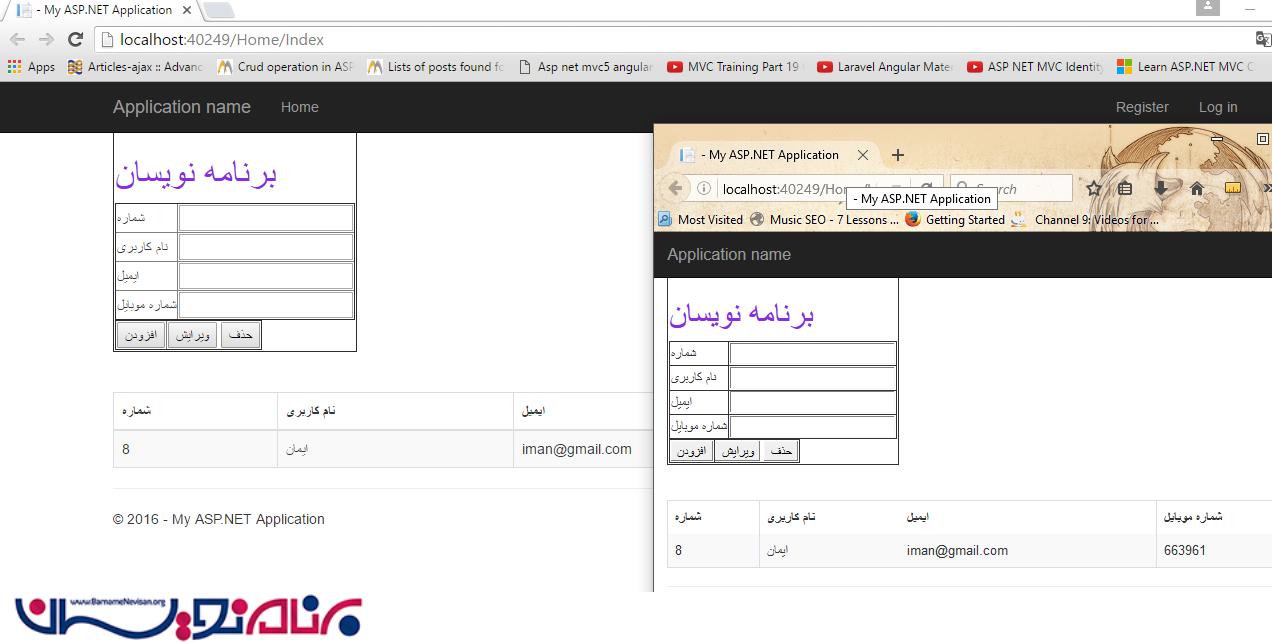
میتوان مشاهده کنید که عملیات به صورت real time انجام می شود .
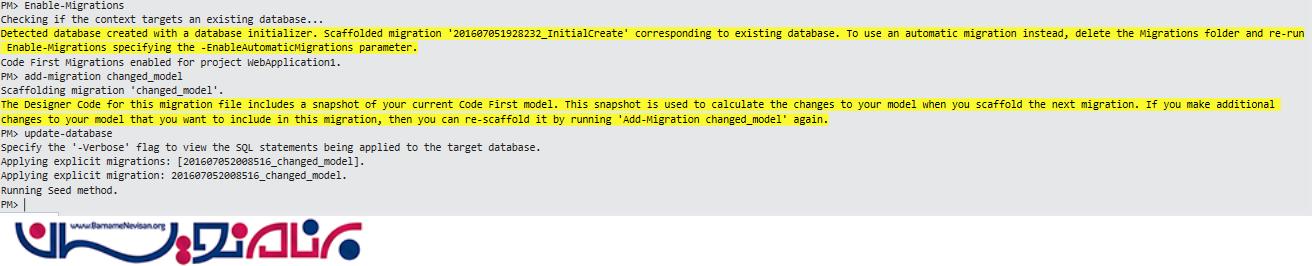
میتوان با استفاده از کد زیر جدول های خود را تغییر دهید :
1. Enable-Migrations first,
                2. then add-migration
                3. followed by update-database commands from package manager console.
آموزش asp.net mvc

- ASP.net MVC
- 5k بازدید
- 7 تشکر