نمونه ای از Notification به همراه ویبره و صدا در اندروید
سه شنبه 10 آذر 1394در این مقاله قصد داریم در مورد Notification صحبت نماییم ، Notification اطلاعیه هایی است که به کاربران اطلاعیه هایی را هشدار می دهد در مقالات قبلی Notification های ساده قرار داده بودیم ولی این مقاله ویبره گوشی و زنگ را هم اضافه کردیم.

اندروید برای ما یک NotificationManager را فراهم می کند که یک متد برای نمایش Notification است ، که زمانی که روی آن کلیک می شود ما می توانیم برای تعریف عملیات یک PendingIntent تعریف نماییم.
می توانید قبل از شروع کار از مقاله ی Non-Removable Notifications در اندروید استفاده نمایید.
برای درست کردن لایه ی Notification ما از یک NotificationCompat.Builder استفاده می نماییم، که متد های مختلفی را برای فعال کردن ویبره و صدا و ... دارد.
قدم اول درست کردن notification و درست کردن PendingIntent است.
Intent myIntent = new Intent(this, NotificationActivity.class);
PendingIntent pendingIntent = PendingIntent.getActivity(this, 0, myIntent, 0);
با کلیک کردن بر روی دکمه یک عملیات و نمایش یک Activity است، ما اینجا یک Activity می سازیم و از یک نمونه Intent و pendingintent استفاده می نماییم.
درست کردن NotificationCompat.Builder:
android.support.v4.app.NotificationCompat.Builder یک لایه ی Notification درست می نماید.که این متد تنظیمات صدا و ویبره را فراهم می نماید.
NotificationCompat.Builder  notificationBuilder = new NotificationCompat.Builder(MainActivity.this)
        .setContentTitle("Notification Demo").setSmallIcon(R.drawable.ic_launcher).setContentIntent(pendingIntent)
        .setContentText("You have got notification.");
درست کردن NotificationManager :
متد notify به کاربر اجازه می دهد، که آیکون برای نوتیفیکیشن بزارد، Led گوشی روشن و خاموش شود، صدا و ویبره برای هر پیغام باشد.
NotificationManager notificationManager = notificationManager.notify(1, notificationBuilder.build());
Notification به همراه ویبره :
یک متد را به نام Setvibrate فراهم می کند، که یک آرایه از جنس long دریافت می کند و روشن و خاموش کردن ویبره را با استفاده از این متد فراهم می کند.
long[] v = {500,1000};
notificationBuilder.setVibrate(v);
اولین Index به مدت میلی ثانیه صبر می کند تا ویبره شروع شود و دومین index به مدت میلی ثانیه صبر می کند تا ویبره خاموش شود.
فراموش نکنید که مجوز های لازم را برای روشن و خاموش شدن بلوتوث قرار دهید.
برای ایجاد نوتیفیکیشن به همراه صدا RingtoneManager.TYPE_NOTIFICATION استفاده می شود.
که توسط متد setsound صدا زده می شود.
Uri uri = RingtoneManager.getDefaultUri(RingtoneManager.TYPE_NOTIFICATION);
notificationBuilder.setSound(uri);
برای اینکه با زدن نوتیفیکیشن به یک صفحه ی دیگر برود و یک activity نمایش داده شود از کد زیر استفاده می شود.
notificationBuilder.setStyle(new NotificationCompat.BigTextStyle().bigText("Big View Styles"));
حالا برای دکمه ای که خود نوتیفیکیشن را ایجاد می کند از کد های زیر استفاده می نماییم.
که یک pendingintent تعریف می نماییم و برای نمایش نوتیفیکیشن در کنار آن از یک آیکون استفاده می نماییم.
PendingIntent childPIntent = PendingIntent.getActivity(MainActivity.this, 0, childIntent, 0);
notificationBuilder.addAction(R.drawable.ic_launcher, "Add", childPIntent);
کد کامل کلاس برای ایجاد نوتیفیکیشن همراه صدا و ویبره:
import android.app.NotificationManager;
import android.app.PendingIntent;
import android.content.Context;
import android.content.Intent;
import android.media.RingtoneManager;
import android.net.Uri;
import android.os.Bundle;
import android.support.v4.app.FragmentActivity;
import android.support.v4.app.NotificationCompat;
import android.view.View;
import android.view.View.OnClickListener;
import android.widget.Button;

public class MainActivity extends FragmentActivity{
	private PendingIntent pendingIntent;
	private NotificationManager notificationManager;
	private NotificationCompat.Builder notificationBuilder;
    @Override
    public void onCreate(Bundle savedInstanceState) {
        super.onCreate(savedInstanceState);
        setContentView(R.layout.mylayout);
		//create Intent
        Intent myIntent = new Intent(this, NotificationActivity.class);
        //Initialize PendingIntent
        pendingIntent = PendingIntent.getActivity(this, 0, myIntent, 0);
        //Initialize NotificationManager using Context.NOTIFICATION_SERVICE
        notificationManager = (NotificationManager)getSystemService(Context.NOTIFICATION_SERVICE);

        //Create listener to listen button click
        OnClickListener listener = new OnClickListener() {
 			public void onClick(View view) {
		        //Prepare Notification Builder
		        notificationBuilder = new NotificationCompat.Builder(MainActivity.this)
        		.setContentTitle("مرجع تخصصی برنامه نویسان").setSmallIcon(R.drawable.logo).setContentIntent(pendingIntent)
        		.setContentText("مقالات امروز");
		    	//add sound
		        Uri uri = RingtoneManager.getDefaultUri(RingtoneManager.TYPE_NOTIFICATION);
			    notificationBuilder.setSound(uri);
			    //vibrate
			    long[] v = {500,1000};
			    notificationBuilder.setVibrate(v);
			    notificationManager.notify(1, notificationBuilder.build());
 			}
          };
         Button btn = (Button)findViewById(R.id.button);
         btn.setOnClickListener(listener);
    }
}
حالا کلاس نوتیفیکیشن:
import android.app.Activity;
import android.os.Bundle;
import android.widget.TextView;

public class NotificationActivity extends Activity {
    @Override
    public void onCreate(Bundle savedInstanceState) {
        super.onCreate(savedInstanceState);
        setContentView(R.layout.msglayout);
        TextView textView = (TextView)findViewById(R.id.msg);
		textView.setText("برنامه نویسان");
    }
}
برای کلاس childnotification هم از قطعه کد زیر استفاده می نمایید:
import android.app.Activity;
import android.os.Bundle;
import android.widget.TextView;

public class ChildNotificationActivity extends Activity {
    @Override
    public void onCreate(Bundle savedInstanceState) {
        super.onCreate(savedInstanceState);
        setContentView(R.layout.child_msg_layout);
        TextView textView = (TextView)findViewById(R.id.childmsg);
		textView.setText("برنامه نویسان");
    }
}
در androidmanifest دسترسی برای ویبره گوشی را قرار دهید:
<?xml version="1.0" encoding="utf-8"?>
<manifest xmlns:android="http://schemas.android.com/apk/res/android"
    package="com.concretepage.android"
    android:versionCode="1"
    android:versionName="1.0" >

    <uses-sdk android:minSdkVersion="11" android:targetSdkVersion="19" />
    <uses-permission android:name="android.permission.VIBRATE" />
    <application
        android:allowBackup ="false"
        android:icon="@drawable/ic_launcher"
        android:label="@string/app_name" >
        <activity  android:name=".MainActivity" android:label="@string/app_name" >
            <intent-filter>
                <action android:name="android.intent.action.MAIN" />
                <category android:name="android.intent.category.LAUNCHER" />
            </intent-filter>
        </activity>
        <activity android:name=".NotificationActivity" android:label="Notification Click Action"/>
        <activity android:name=".ChildNotificationActivity" android:label="Child Notification Click Action"/>
    </application>
</manifest>
داخل لایه ی xmlبرای نمایش نوتیفیکیشن که با زدن دکمه نوتیفیکیشن اجرا خواهد شد از کد زیر استفاده می نماییم:
<LinearLayout xmlns:android="http://schemas.android.com/apk/res/android"
    xmlns:tools="http://schemas.android.com/tools"
    android:layout_width="match_parent"
    android:layout_height="match_parent"
    android:background="#D1C4E9"
    android:orientation="vertical" >
    <Button
        android:id="@+id/button"
        android:layout_width="fill_parent"
        android:layout_height="wrap_content"
        android:text="نمایش Notification"/>
</LinearLayout>
داخل لایه ی xml که با زدن نوتیفیکیشن به صفحه اصلی می رویم:
<LinearLayout xmlns:android="http://schemas.android.com/apk/res/android"
    xmlns:tools="http://schemas.android.com/tools"
    android:layout_width="match_parent"
    android:layout_height="match_parent"
    android:background="#D1C4E9"
    android:orientation="vertical" >
    <TextView
        android:layout_width="wrap_content"
        android:layout_height="wrap_content"
	    android:layout_gravity="center"
	    android:textColor="#b0b0ff"
	    android:textSize="30sp"
	    android:id="@+id/msg"/>
</LinearLayout>
xml بعدی:
<?xml version="1.0" encoding="utf-8"?>
<LinearLayout xmlns:android="http://schemas.android.com/apk/res/android"
    xmlns:tools="http://schemas.android.com/tools"
    android:layout_width="match_parent"
    android:layout_height="match_parent"
    android:background="#D1C4E9"
    android:orientation="vertical" >
    <TextView
            android:layout_width="wrap_content"
            android:layout_height="wrap_content"
	    android:layout_gravity="center"
	    android:textColor="#b0b0ff"
	    android:textSize="30sp"
	    android:id="@+id/childmsg"/>
</LinearLayout>
برای فایل xml که در پوشه ی value قرار دارد و نام activity ها می توانیم اینجا اسم گذاری کرد:
<resources>
    <string name="app_name">صفحه اصلی</string>
    <string name="btn"> نمایش Notification</string>
</resources>
حتما کتابخانه ی android-support-v4 را در داخل پروژه قرار دهید اگر نحوه ی اضافه کردن کتابخانه را نمی دانید به این مقاله ایجاد نمودار با استفاده از کتابخانه ی AChartEngine در اندروید رجوع فرمایید.
خروجی به صورت زیر خواهد بود:
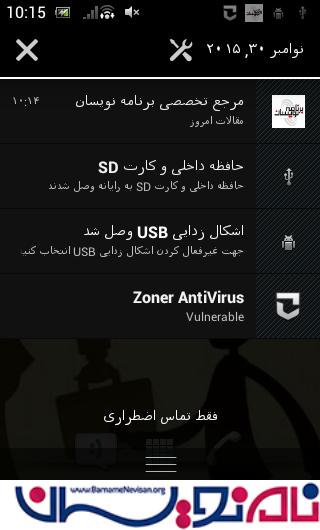
اگر روی دکمه بزنید به همراه زنگ و ویبره یک نوتیفیکیشن نمایش داده خواهد شد.

- Android
- 3k بازدید
- 1 تشکر